


Bringing a Brother printer into your workspace or home opens the door to efficient and high-quality printing. To start enjoying these benefits, you need to correctly install your Brother printer on your Windows or Mac computer. In this comprehensive guide, we’ll walk you through the step-by-step Brother printer installer process for both Windows and Mac, ensuring that you can print effortlessly from your preferred operating system.
Installing a Brother Printer on Windows:
Step 1: Unbox and Prepare
Unbox your Brother printer and place it near a power source and your Windows computer.
Step 2: Connect and Power On
Connect the printer to your computer using the provided USB cable. Ensure the printer and computer are powered on.
Step 3: Download Drivers
Visit the Brother support website and search for your printer model. Download the latest drivers and software for Windows.
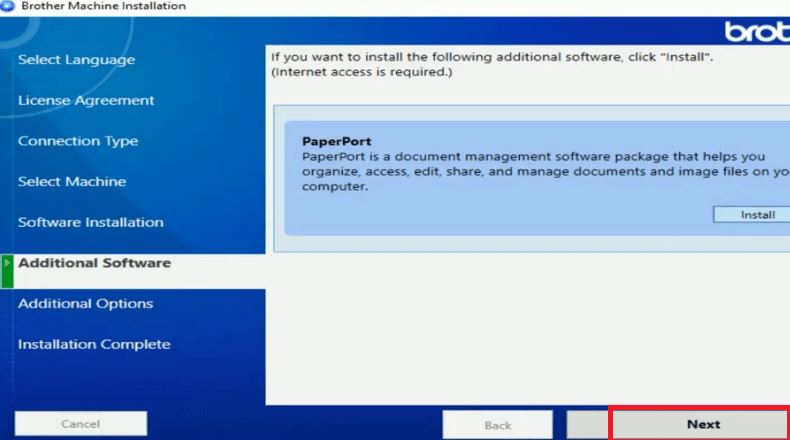
Step 4: Install Drivers
Run the downloaded driver file and follow the on-screen instructions to install the drivers and software. Be sure to select your printer during the installation process.
Step 5: Test Print
After installation, print a test page to confirm that the printer is working correctly.
Installing a Brother Printer on Mac:
Step 1: Unbox and Prepare
Unbox your Brother printer and place it near a power source and your Mac computer.
Step 2: Connect and Power On
Connect the printer to your Mac using the provided USB cable. Ensure the printer and Mac are powered on.
Step 3: Download Drivers
Visit the Brother support website and search for your printer model. Download the latest drivers and software for macOS.
Step 4: Install Drivers
Run the downloaded driver file and follow the on-screen instructions to install the drivers and software. Be sure to select your printer during the installation process.
Step 5: Test Print
After installation, print a test page to confirm that the printer is working correctly.
With this guide, you can confidently install your Brother printer on both Windows and Mac operating systems, unlocking the convenience and efficiency of high-quality printing. Whether you’re using a Windows PC or a Mac, the installation process is straightforward and ensures that your printer is ready to meet your printing needs
Fixing the Disconnect: Brother Printer Not Connecting to Wi-Fi – Troubleshooting Guide
Step 1: Verify Wi-Fi Signal
- Begin by ensuring that your Wi-Fi network is operational and that other devices can connect to it without any issues. A stable network is crucial for successful printer connectivity.
Step 2: Restart Your Devices
- Sometimes, a simple restart can resolve the problem. Power off your Brother printer, Wi-Fi router, and the device you’re trying to print from. Wait for a minute, then power them back on.
Step 3: Check Printer and Network Settings
- Access your Brother printer’s control panel or LCD screen and navigate to the network settings menu. Double-check that the printer is connected to the correct Wi-Fi network and that the Wi-Fi password is entered correctly.
Step 4: Reconnect to Wi-Fi
- If your printer isn’t connected to Wi-Fi, select the appropriate network from the list of available networks and enter the Wi-Fi password when prompted.
Step 5: Update Firmware and Software
- Outdated printer firmware or driver software can lead to connectivity issues. Visit the Brother support website to download and install the latest firmware and software updates for your printer model.
Step 6: Disable VPN or Proxy
- If you’re using a VPN or proxy server on your network, it may be interfering with your printer’s ability to connect to Wi-Fi. Temporarily disable these services and try connecting your printer again.
Step 7: Reset Network Settings
- As a last resort, you can reset your printer’s network settings to the default. Keep in mind that this will erase all network configurations, so be prepared to reconfigure your Wi-Fi settings.
A Brother printer not connecting to Wi-Fi can be frustrating, but with these troubleshooting steps, you can often resolve the issue quickly. Maintaining a stable network, updating your printer’s firmware and software, and double-checking your settings can help prevent such problems in the future.


![closeup-female-hand-placing-medicament-domestic-first-aid-kit-storage-organization-emergency-supply_226903-2012[1]](https://www.searchnewsinc.com/wp-content/uploads/2023/09/closeup-female-hand-placing-medicament-domestic-first-aid-kit-storage-organization-emergency-supply_226903-20121-300x200.jpg)


